You’ve finally found the perfect spot for a picture, mirror, or piece of wall décor. You grab a tape measure, a pencil, a level, and some hardware. What should be a quick project turns into multiple holes in the wall, repeated measurements, and a frame that still doesn’t look right.
If that sounds familiar, you’re not alone.
Most people make the same few mistakes when hanging pictures. The good news is that they’re easy to
avoid once you know what causes them.
One of the most common mistakes is measuring the frame itself instead of the actual hanging hardware.
The frame may be 24 inches wide, but if the D-rings or hanging wire are not perfectly centered, measuring from the frame edges won’t guarantee the mounting hardware ends up in the correct location.
This often leads to pictures hanging off-center or tilted.
Always measure from the actual hanging hardware, not the outside dimensions of the frame.
Many people assume the D-rings, wire, or sawtooth hanger on the back of a frame were installed perfectly at the factory.
Unfortunately, that’s not always the case.
Even a difference of a quarter inch between two D-rings can cause a frame to hang crooked. Decorative frames and imported wall décor are especially prone to hardware placement errors.
Inspect the hanging hardware before installation and verify both mounting points are positioned correctly.
A typical picture-hanging project may require:
The more steps involved, the greater the chance for errors.
Each additional measurement creates another opportunity for mistakes.
Simplify the process whenever possible and reduce the number of measurements required.
Many people accurately mark the left and right mounting locations but forget to account for the depth of the hanging hardware.
The result is a picture that hangs lower, higher, or farther from the wall than expected.
Consider both the spacing and depth of the hanging hardware when marking mounting locations.
It’s common to measure once, drill, and hope for the best.
Unfortunately, even a small measurement error can become very noticeable once a frame is hanging on the
wall.
Double-check measurements before drilling or installing anchors.*
Many homeowners expect they’ll simply “adjust it later” if the picture isn’t level.
What often happens is a cycle of removing, re-measuring, patching holes, and starting over.
Take the time to accurately transfer mounting locations before making holes in the wall.
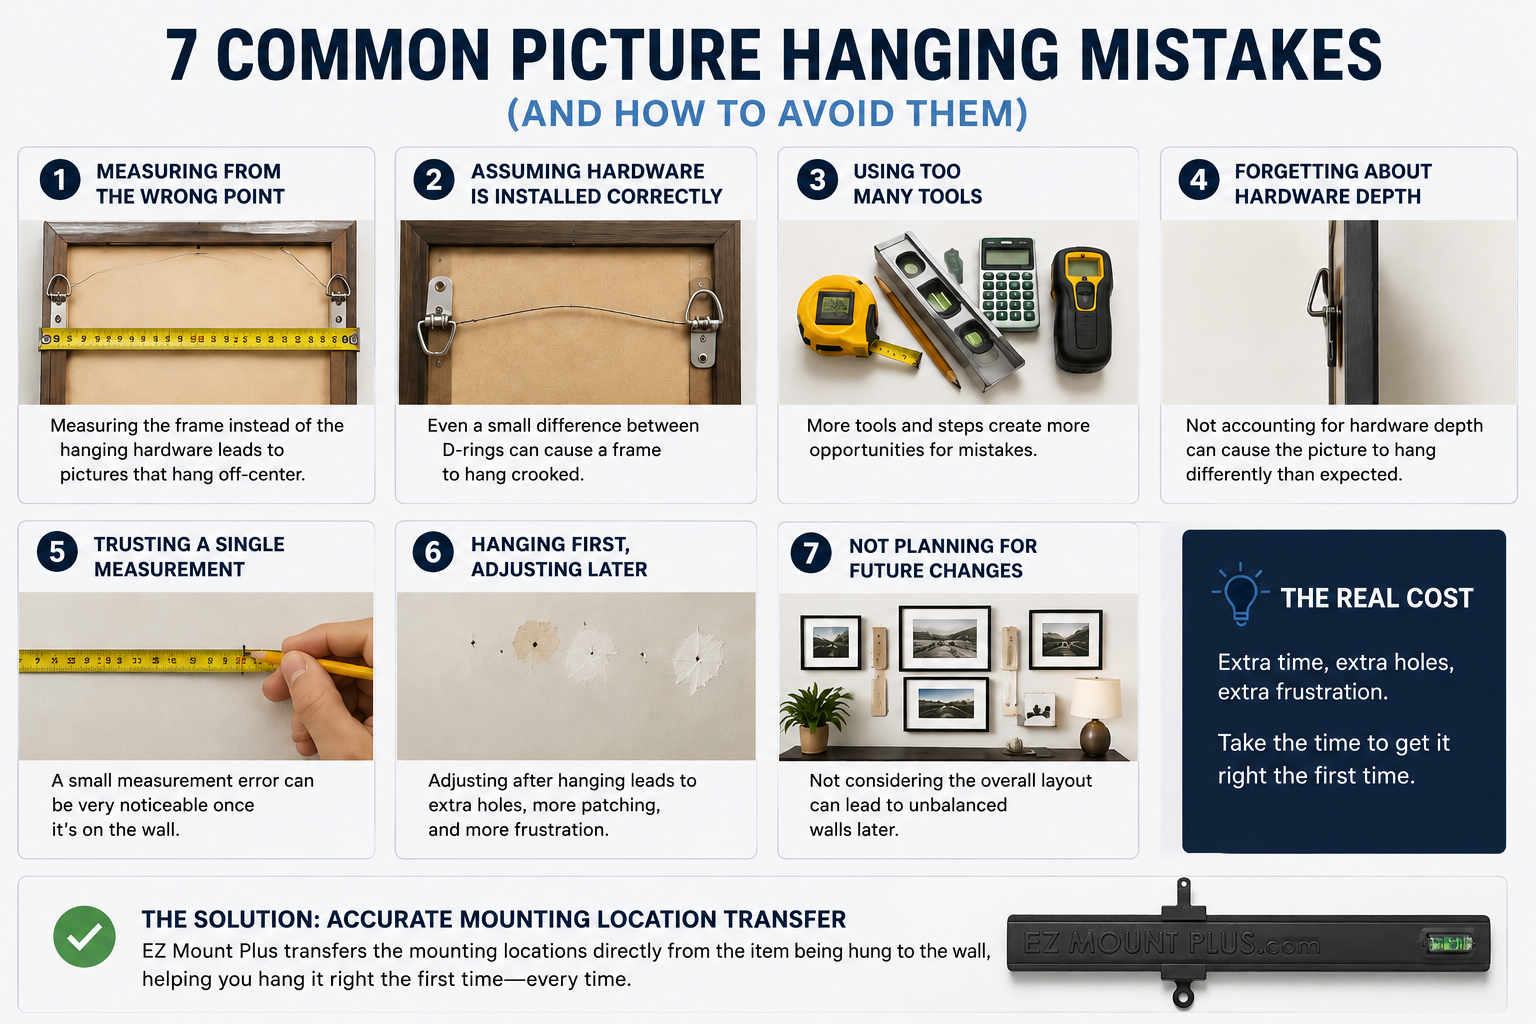
People often arrange one picture at a time without considering future additions.
Later, when more pictures are added, the wall can feel unbalanced or crowded.
Consider the overall wall layout before installing the first piece.
Most picture hanging mistakes don’t result in major damage. Instead, they create frustration.
You spend more time measuring.
You make extra holes in the wall.
You lose confidence in the process.
And what should have taken five minutes turns into an hour-long project.
The goal isn’t just hanging a picture. The goal is hanging it correctly the first time.
The easier it is to transfer mounting locations accurately, the fewer mistakes you’ll make.
EZ Mount Plus was designed around a simple concept: transfer mounting locations directly from the item being hung to the wall, reducing the need for repeated measurements and minimizing installation errors.*
Whether you’re hanging framed artwork, mirrors, shelves, clocks, or wall décor, accurate mounting location transfer can help eliminate many of the common mistakes homeowners encounter.